Outriggers, surely the bane of every TVR owner? In common with many of you I’m sure, I was keen to inspect the outriggers on my 1996 Griff 500. I had bought the car mid 2007, I read everything I could on them and did as much inspecting prior to purchase as a trolley jack generally will allow.
My car had been regularly Waxoyled, but the upper front wishbones had already been replaced and the upper rear ones were looking the worst for wear. If they are showing signs of rot despite the Waxoyl then surely my outriggers aren’t going to be in good condition? It was no good, that nagging doubt and the multitude of pictures I’d seen of outrigger rot meant I had to take the body off to have a look.
Now the only facilities I have are a single garage, a trolley jack, a few scissor jacks and two pairs of decent axle stands. The more I thought about it the more problems I could see. Where would I store the body? Will I be able to get the necessary six to eight people together at the right time? Do I really want to disconnect the braking system, the exhaust, the clutch and all the wiring? Surely there must be another way to get to them?
I had heard mention of the 2″ body raise and the more I looked into it on the net the more it looked like the technique that best suited my circumstances.
Pros
- You can leave the wiring in the engine bay connected.
- You can leave the brake pipes connected.
- Fuel lines/plenum connected.
- Exhaust system stays connected (risk of head stud breakage).
- Can convert to body off if necessary.
- One man job.
Cons
- Access is reasonable for the outriggers but the upper chassis rails are still inaccessible however they don’t tend to rot.
- Working conditions are quite cramped, the body needs to be well protected to prevent wire wheel or emery tape damage.
Tooling
- Trolley Jack
- Two pairs of axle stands
- Set of metric combination spanners
- Set of imperial combination spanners
- Socket set
- Torque wrench
- Small flexible drive grinder
Method
Photograph everything you arent 100% sure of. Bag and mark all fasteners that you remove.
Tag all wiring connections that you are 100% sure of. I found microwave food containers to be a huge asset as you can leave little piles of fasteners dotted around the car.
Crack the wheel bolts off a fraction before jacking the car up. Get the car as high as you safely can on axle stands and remove the wheels. I placed the wheels under the car as a precaution in case the axle stands let go.
Unlock the boot.
DISCONNECT THE BATTERY.
It’s best to disconnect the battery fairly early on in the proceedings to prevent any unplanned fires! Mark a chalk line on the floor so that you can get the battery back in the same location when you come to rebuild! If you don’t it’s a swine to line the battery up with the fixing holes in the floor. There are two M8 set screws with penny washers just behind the front nearside wheel which need to be undone to allow you to pull the battery box back towards the passenger seat. You can leave the battery sitting loose on the floor until you remove the seats later on.
From underneath the car
Fuel Pump/Tank
Disconnect the fuel pump feed pipe coming from the tank by the nearside rear wheel.
Here you can decide whether to drain the tank from below or, insert an M12 bolt into the pipe and retighten the hose clip. If you are draining from below it’s easier to disconnect the pipe at the fuel pump junction rather than the tank end to allow you to get the fuel into a container.
It was suggested that you should dig out the sealant where this pipe comes through the lower boot body work, but for a 2” raise with hindsight I’d probably be inclined to leave it be. If you have to dig it out later on then so be it. Mark/photograph the fuel pump wiring then disconnect it.
The fuel tank doesn’t need to come out of the car for a 2” raise, but it does need to be disconnected and moved backwards slightly to gain access to the four rear chassis bolts.
You will need to pull the cover that lives below the boot back to expose the two upper tank fixings and the tank filler neck. Remove the filler neck by undoing the two large jubilee clips. With a bit of twisting the filler neck can be removed upwards and clear of the car. Undo these and then locate the two lower tank fixings. These are under the carpet in the boot and can be seen near the exhaust under the car. They are the two M8 bolts with penny washers. You can either remove the carpet to gain access in the boot or cut a small nick in the carpet and glue it back down later. Once the tank is loose it can be pulled back and you’ll see the rear chassis bolts.
Undo handbrake tension
Reaching above the diff from the offside, wind back the handbrake adjuster back until the cable drops from the mounting, this will allow you to extend the handbrake lever almost vertical which will be required later on to lift the T bone centre console. The console has two chassis bolts and an earth connection underneath it.
Seats
The seats are held in place by four M8 Set screws. Remove the seats and their mounting brackets by locking a flat bladed screwdriver between the bolt head and the adjusting rail and then undo the nuts from below. The seats just lift out once the nuts are undone. It’s worth inspecting the floor pan around the mountings as I found one of the eight mounting points was crazing slightly when I removed the penny washers. It’s easy enough to drill tiny holes at the end of the cracks to prevent them growing and strengthen the mounting points with fibreglass when the body is up if you have this problem.
Once the seats are out you can remove the battery box and the battery.
Seat belts
While you’re in the area, remove the lower seat belt mounting, the inertia reel assembly and the latching mechanism that mounts on the transmission tunnel. The upper mounts can stay connected. If you can spray penetrating oil on the lower fixings from underneath before I would strongly recommend it. The seat belt mountings in common with the chassis bolts can be fairly well seized and require a hefty amount of torque to remove them. I loosened them a fraction and then turned them back in a quarter turn in the same way as you would tap a hole. I never turned them more than a complete turn at a time to prevent heat build up and expansion which would make them even harder to remove. The reason I took extreme care when removing them is that if they shear they will prevent you raising the body to extract them! You have been warned. Once detached the belts can be left sitting on the rear parcel shelf.
Centre console.
The centre console is retained by four M6 nuts, two on each side under the T section. Undo these and then pull the centre console up and to the rear. It needs to come up quite a way to clear the gear lever and the handbrake but once loose it can be left laying in the car with all the wiring still attached.
Steering column
Undo the lower UJ of the steering column.
Mark with a dot punch the position of the shafts to the UJ’s for re-assembly.
Undo the four M8 bolts which hold the rack down, this will allow some movement to get the UJ off the steering shaft. Allow the steering shaft to fall back toward the driver’s footwell.
Radiator Pipes
Undo the radiator rubber/silicon hoses and drain. Remove the hoses which bridge between the chassis/body. Remove the radiator to gain access to the lower chassis bolts and ARB mounts.
Radiator
The radiator is a bit of a pain to remove due to it’s size and weight. To get it clear of the car you will first need to remove the alarm sounder and it’s bracket. The radiator is held in place by two nuts towards the top. Remove these and tilt the radiator towards the back of the car so that it starts to come out vertically. At the same time you need to rotate it and flip it so that it lifts out. If I was doing the job again I would be inclined to see if there is a way to leave it loose but in situ. The only reason for removing it is to get to the front lower chassis bolts. It doesn’t interfere with the body lift.
ARB
Disconnect the ARB drop links. Undo the four M10 bolts for the ARB mounts. Remove the ARB sideways from the car or wriggle it out of the way.Chassis Bolts.
There are twenty two chassis bolts in total. Four are in the boot, two are below the radiator and sixteen are in the cabin.
Boot
Remove the four rear chassis fasteners, two M10 hex socket screws and two upper dome head cap screws (6mm Allen key).
Engine Bay
Remove the two M10 hex socket set screws just below the front ARB mounts. On my car the offside mounting was also an earth point.
Cabin
There are eight floor bolts on each side and in true TVR style some of the nuts are captive and some aren’t. Lifting the carpet over them will expose the heads enough to remove.
Drivers side
There are two M10 set screws at the rear, three mid floor, two by the pedals and one above the transmission tunnel.
Passengers side
There are two M10 set screws at the rear, three mid floor, two in front of the battery box and one above the transmission tunnel.
You may well find the chassis bolts shear off however careful you are and even with liberal applications of penetrating oil. If this happens, don’t panic just carefully grind the welds off from below with a flexible miniature grinder and the captive nuts will fall away. I replaced mine with NyLock nuts.
Fasteners checklist

Prior to raising the body cross check that the following fasteners have been removed!
Front
2 M10 Hex bolts (lower front chassis fixings).These are below the radiator.
Cabin
Eight floor bolts on each side.
Two at the rear.
Three mid floor.
Two at the front under the pedals/battery box.
Below the T bone centre console.
2 x M10 bolts slightly ahead and to either side of the gear lever.
Rear
Four rear chassis fasteners behind the fuel tank, two lower M10 (17mm spanner) hex bolts and two upper dome head cap screw (6mm Allen key).
Raising the body
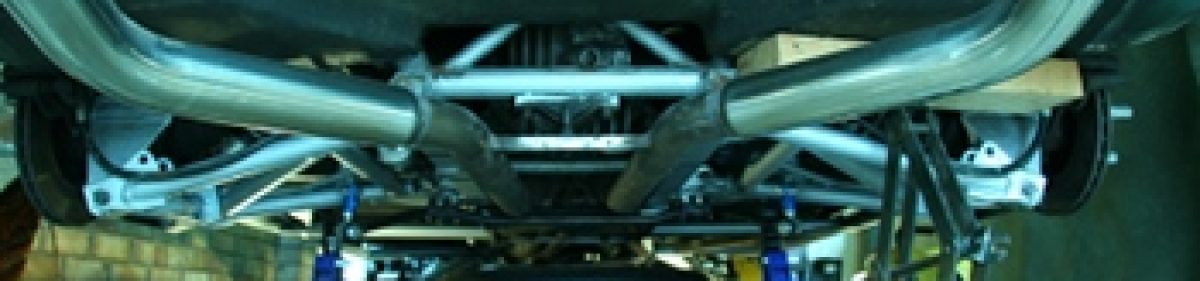
I used three jacks and some suitable lengths of 2 x 1 to get the body up. You can always use more jacks if you feel happier. I placed one jack below the nose section with a bit of 2 x 1 to spread the load. I used two jacks for the rear with one placed either side of the car just behind the rear wheels. The trick definitely seems to be a little and often. Rather than jacking the body off I sort of lifted it by hand and then took the slack up with my jacks. If you place your back to the car and hold the arch you can jiggle the body and it will eventually come loose. A word of warning, the Griffith isn’t excessively heavy and if you’re enthusiastic it’s possible to lift one quarter of the car clear of the axle stand which can be a little alarming! The nose section is very light and can be lifted by grasping just below the TVR badge. The rear is a little heavier and needs to be jacked the whole way up. The body will slowly expose the outriggers as it goes up. You will get about 20mm of clearance, the thickness of your hand when it’s as high as it goes. The limiting factor is where the exhaust system fouls the bulkhead. If you’re lifting and taking up the slack you’ll know when you reach the point of maximum lift.
Once the body is raised place some wooden packing between the outriggers and the lowest point of the body to support the weight. You can’t have too much packing and it can be moved about as you work in sections. The packing is important, it stops your fingers getting trapped and spreads the load of the body.
As far as the body raise goes, that’s it. The body should now be sat clear of the car and you can inspect your outriggers and perform whatever treatments you need to. The crucial areas above the mounting plates are visible although a mirror certainly helps. In this position you could weld in new outriggers should you be unlucky, or if you really needed you could convert to a total body off by removing the exhaust, the electrics and the fuel and brake pipes.
While you’re here, how about having a look at www.networkingsupportservices.co.uk our new network support company. This is what pays the bills…
![]()